
Privacy Policy
The purpose of this privacy policy is to help you understand how the app works and the permissions required for using the app. More generally, I think of the app privacy policy as a feature and hope that you'll agree.
Introduction & Agreement Notes
• MSMS application is used to facilitate the user to send SMS messages via Android device, by sending the messages automatically one by one same as the user would do manually.
• In order to be able to send an SMS you must have message credits. Inside the app you are able to purchase message credit packets. Additionally to message credits charge you will also be charged by your mobile service provider as usual. MSMS application owners do not cover any financial costs of the user caused by using the app.
Account and Data Deletion
You have the right to request deletion of your account and any personal data associated with the MSMS app.
To request deletion, please send an email to stavbodik@gmail.com with the Google account email address you used to sign in.
Your request will be reviewed and processed within 7 calendar days.
Login using Google — Data Protection
In order to login to MSMS application you are required to accept access to your private information from Google such as id, email, profile, name, etc.
If you accept to login into MSMS using the Google sign-in button, MSMS will only access your email address in order to store it in the application database. MSMS needs your email address in order to recognize your account each time you come back to the app. MSMS will never share your email address to the public, or access and share other/additional information using Google sign in.
In any case you can always send a request to remove your account and data stored from Google:
stavbodik@gmail.com
Android Permissions
android.permission.READ_CONTACTS— used for importing user contacts from device.android.permission.WRITE_EXTERNAL_STORAGE— used to save user messages/contact lists to device storage.android.permission.READ_EXTERNAL_STORAGE— used to read user messages/contact lists from device storage.android.permission.RECEIVE_SMS— used for detecting whenever a message is received.android.permission.RECEIVE_BOOT_COMPLETED— used when the device restarts to check if there is a scheduled message sending progress waiting to start.android.permission.WAKE_LOCK— used to keep the processor from sleeping when the screen is off while sending messages.android.permission.READ_PHONE_STATE— used to notify user in case the network provider is not set.android.permission.SEND_SMS— used to send messages automatically from the device.
MSMS sends messages one at a time, exactly as you would do manually.
Possible causes:
a. See FAQ #11 on this page.
b. Some carriers (e.g. Verizon) have automatic spam-blocking for bulk SMS.
c. A network connectivity issue occurred while sending.
Things to try:
a. Look for a pattern among the contacts who didn't receive your message. For example, one user found that all missed messages were going to the same carrier (Verizon).
b. Increase the delay between messages in the Sending Panel settings.
c. Uninstall any other SMS-related apps on your device, such as Messenger.
For more information: https://stackoverflow.com/a/27864770/4120180
Have you recently installed any other SMS-related apps? If so, try uninstalling them.
If that doesn't help, delete the MSMS folder from your SD card and restart the app. Be sure to back it up first — it contains all your sending lists and messages.
To do this, tap the add contact icon in the contacts list panel, then tap the import-from-device icon in the top left.
To merge a group of device contacts into an existing list, check the "Mix with current list" option when importing.
Go to Settings inside the Sending Panel in MSMS and switch the SIM to SIM 2.
If the app is closed, crashes, or the battery dies, your progress is automatically saved. When you reopen the app, it will resume from where it left off — no contact will be messaged twice.
Even if you have other apps like Facebook Messenger installed, they cannot send SMS unless they are set as the default. MSMS needs this permission to function.
You can always revert this in your device's app settings.
For more info: XDA Developers — Google Play SMS Policy
This section shows a basic flow of how to send SMS to multiple recipients using phone contacts.
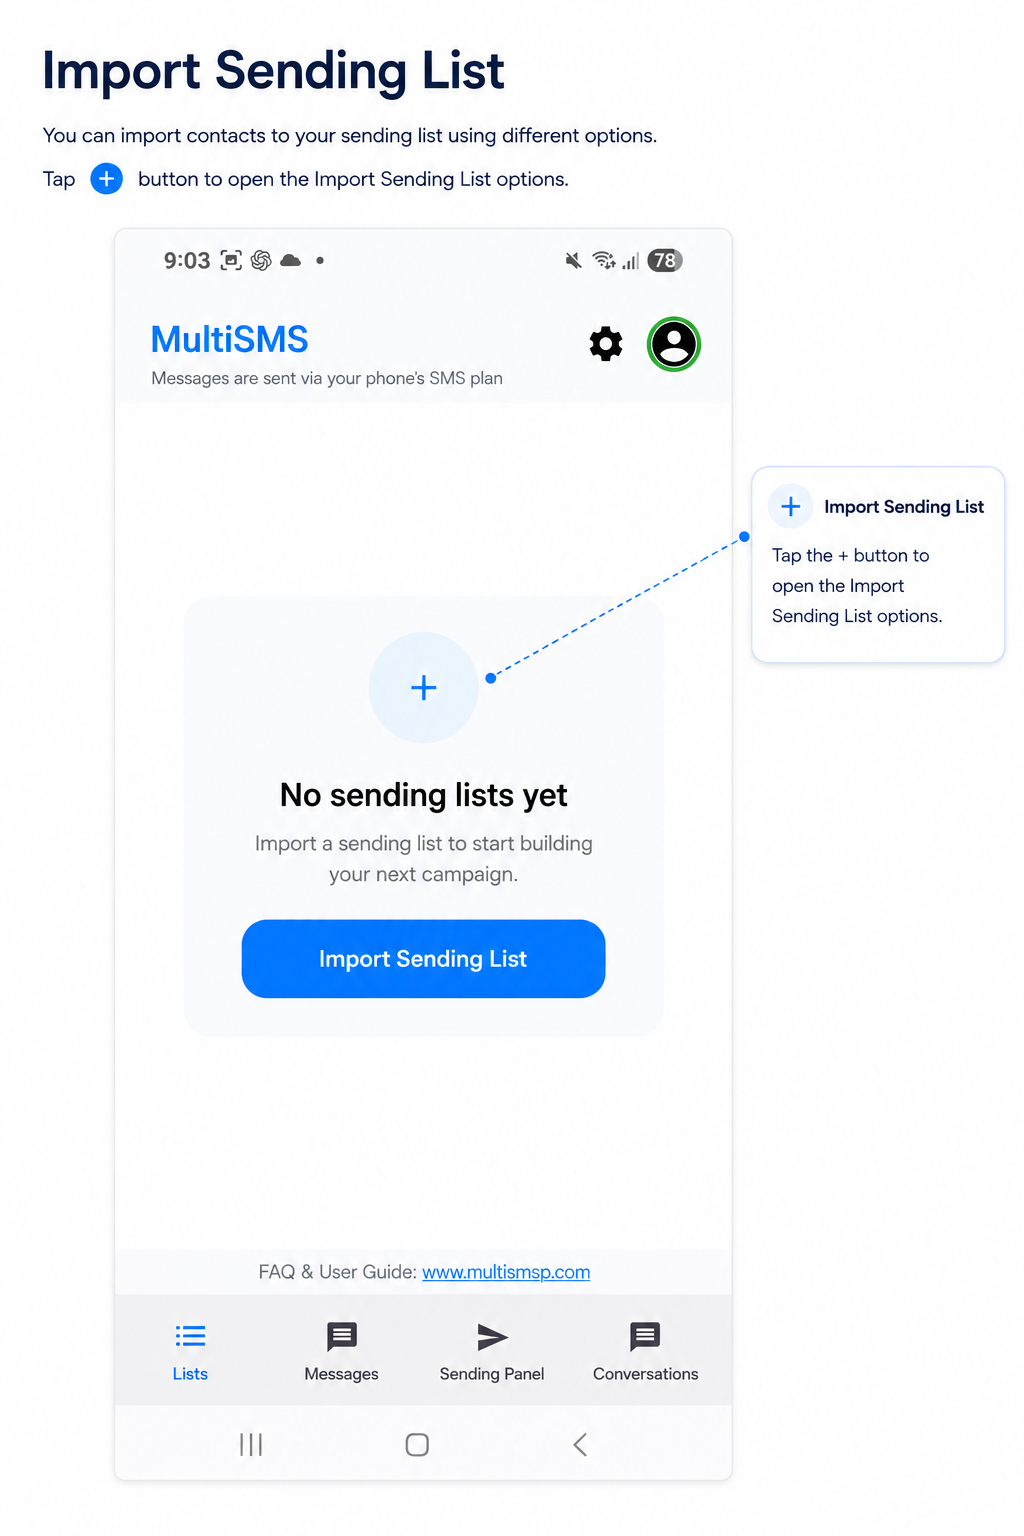
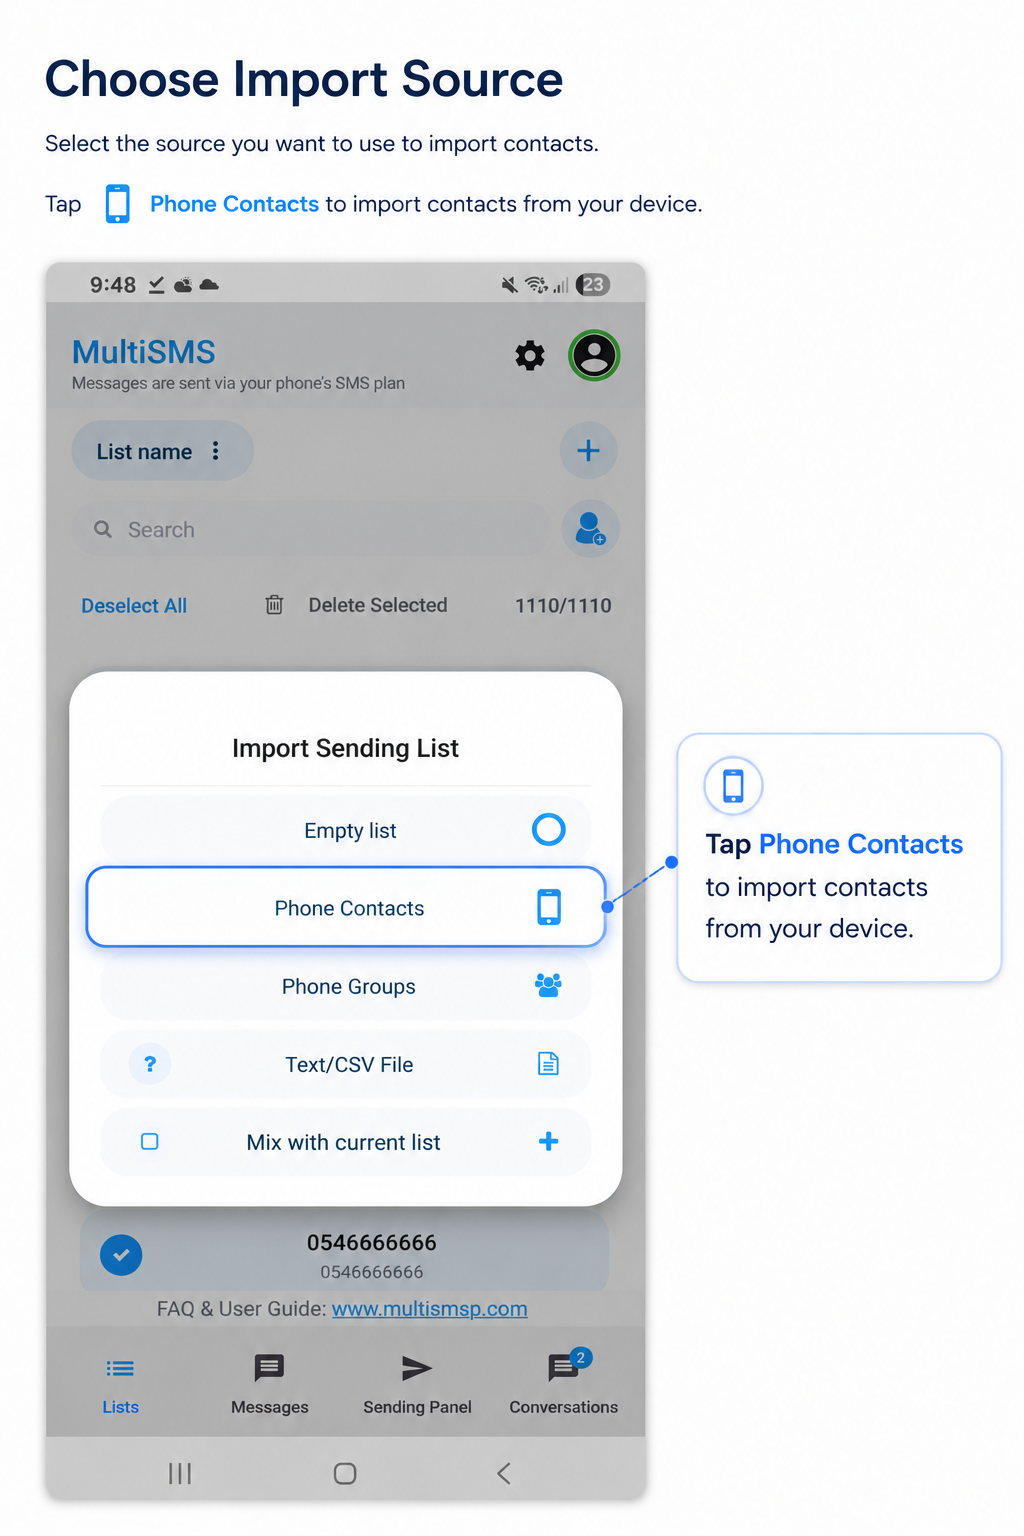
In MSMS you can import contacts from a number of sources: phone contacts/groups, files and Google. When you import a contact list you are creating a new sending list group. The application saves it automatically for later use. You can have as many groups as you like, each with an unlimited number of contacts.
1. Import Contacts
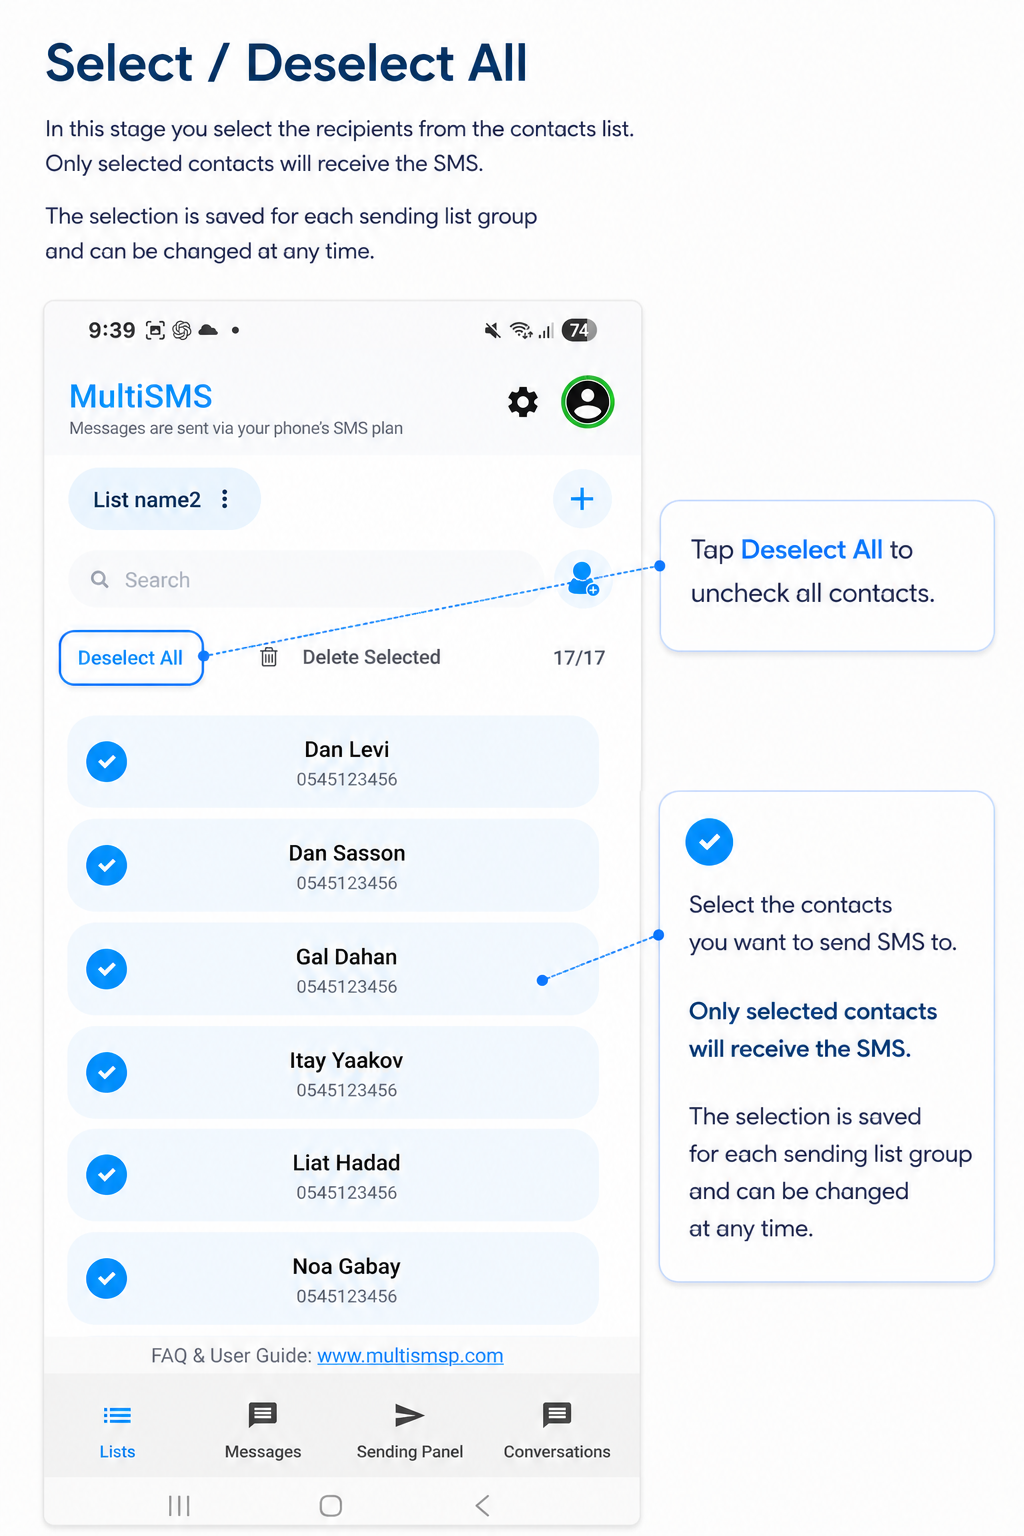
2. Select Recipients
In this stage you select the recipients from the contacts list. Only selected contacts will receive the SMS. The selection is saved for each sending list group and can be changed at any time.
3. Create SMS Message
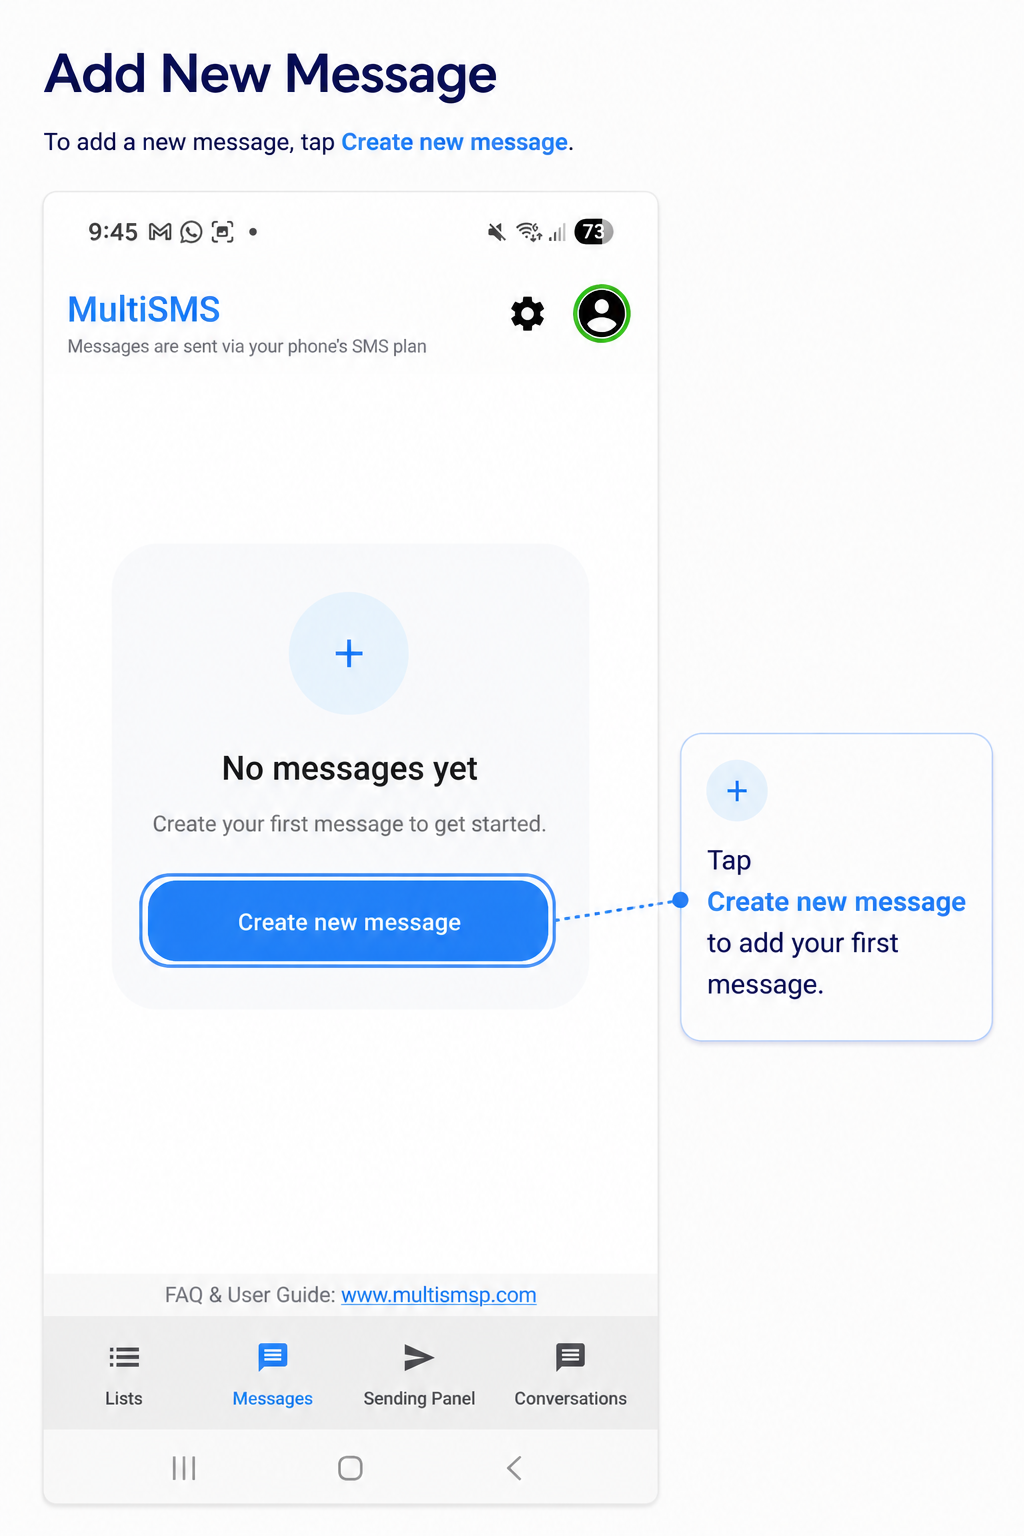
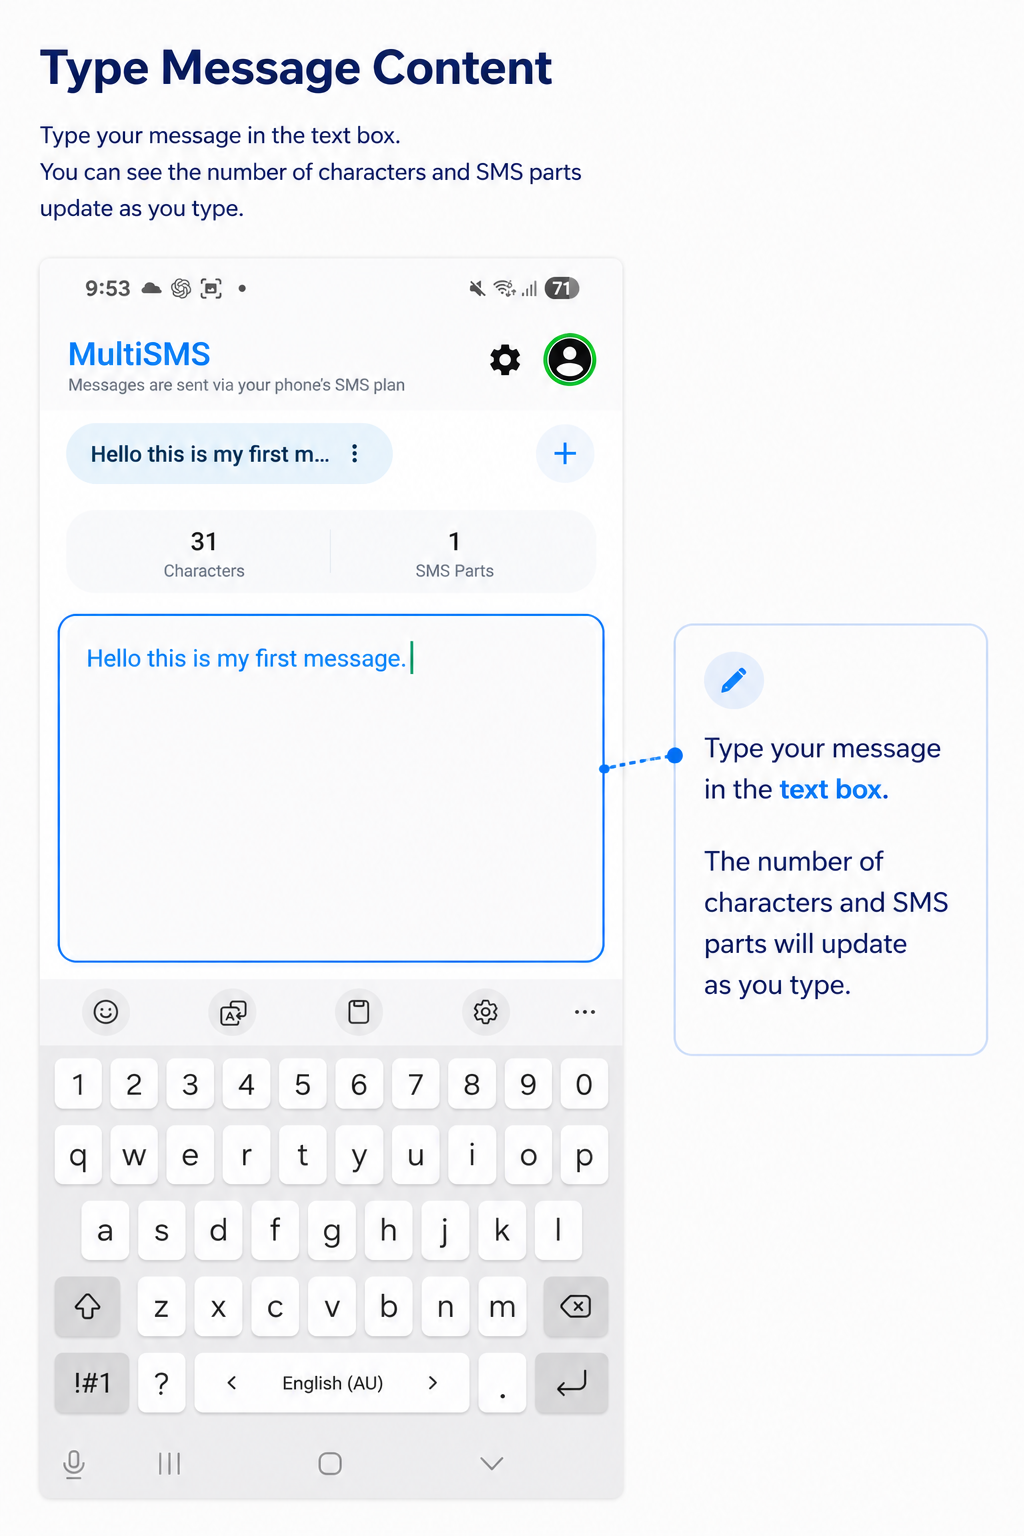
In MSMS you can have as many messages as you like, each with an unlimited number of characters. The application saves new messages automatically for later use.
4. Start Sending
MSMS Import window allows you to import contact lists from a number of sources. This section explains how to import from each source.
Overview
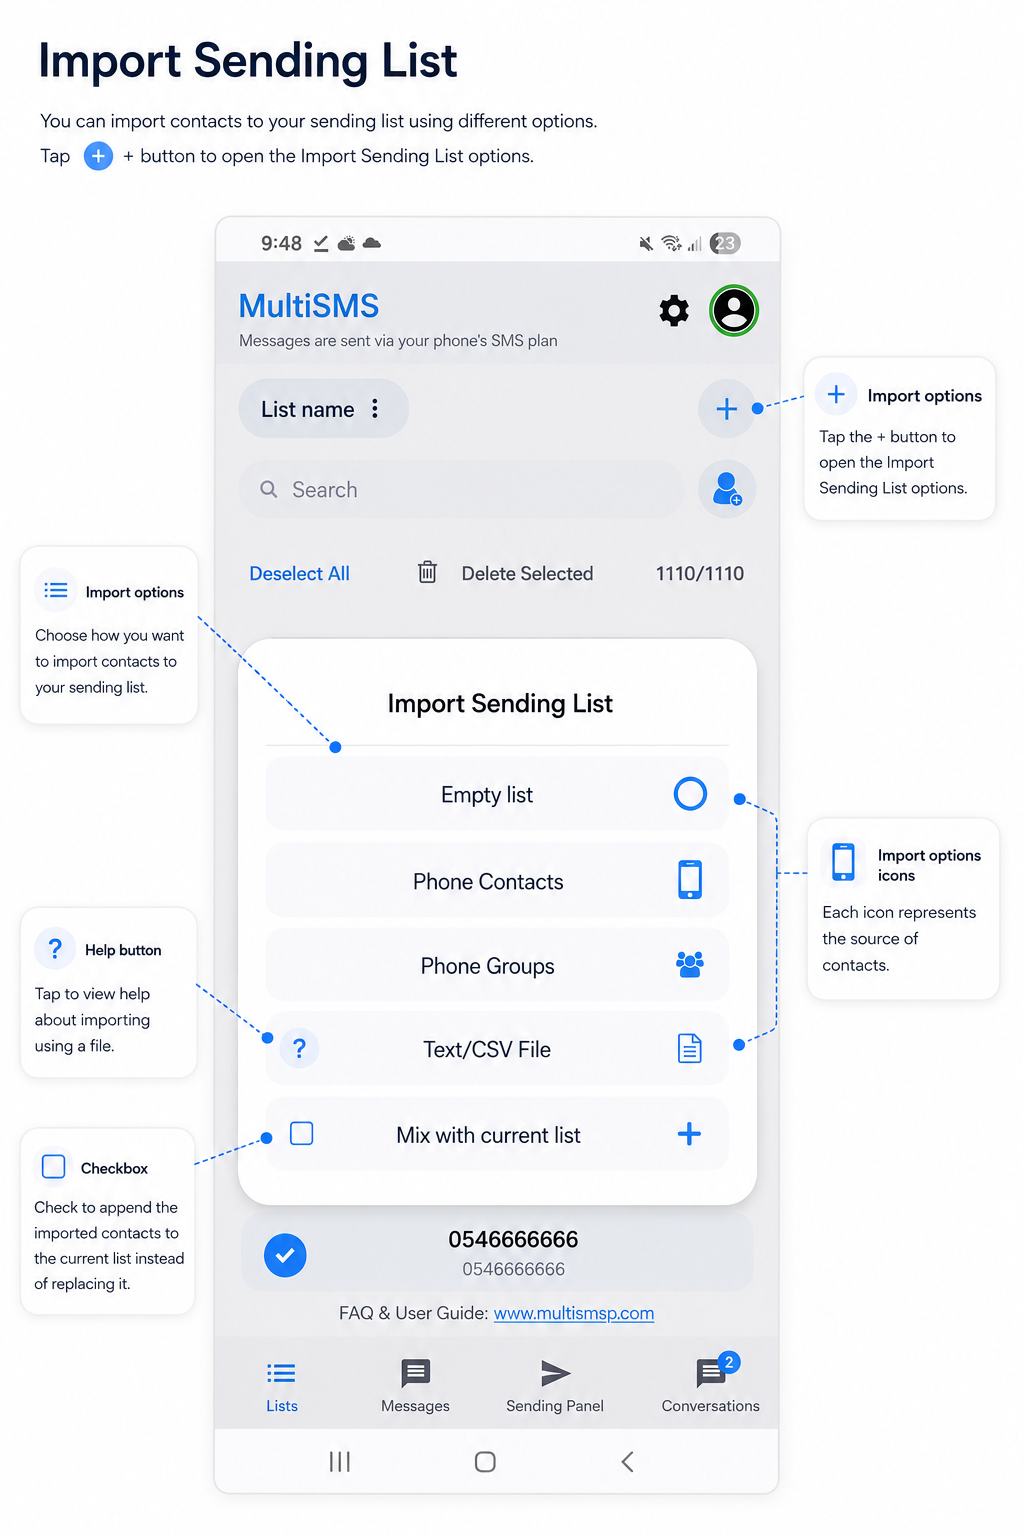
Empty List
Used when you want to create a new sending list group and add contacts manually one by one.
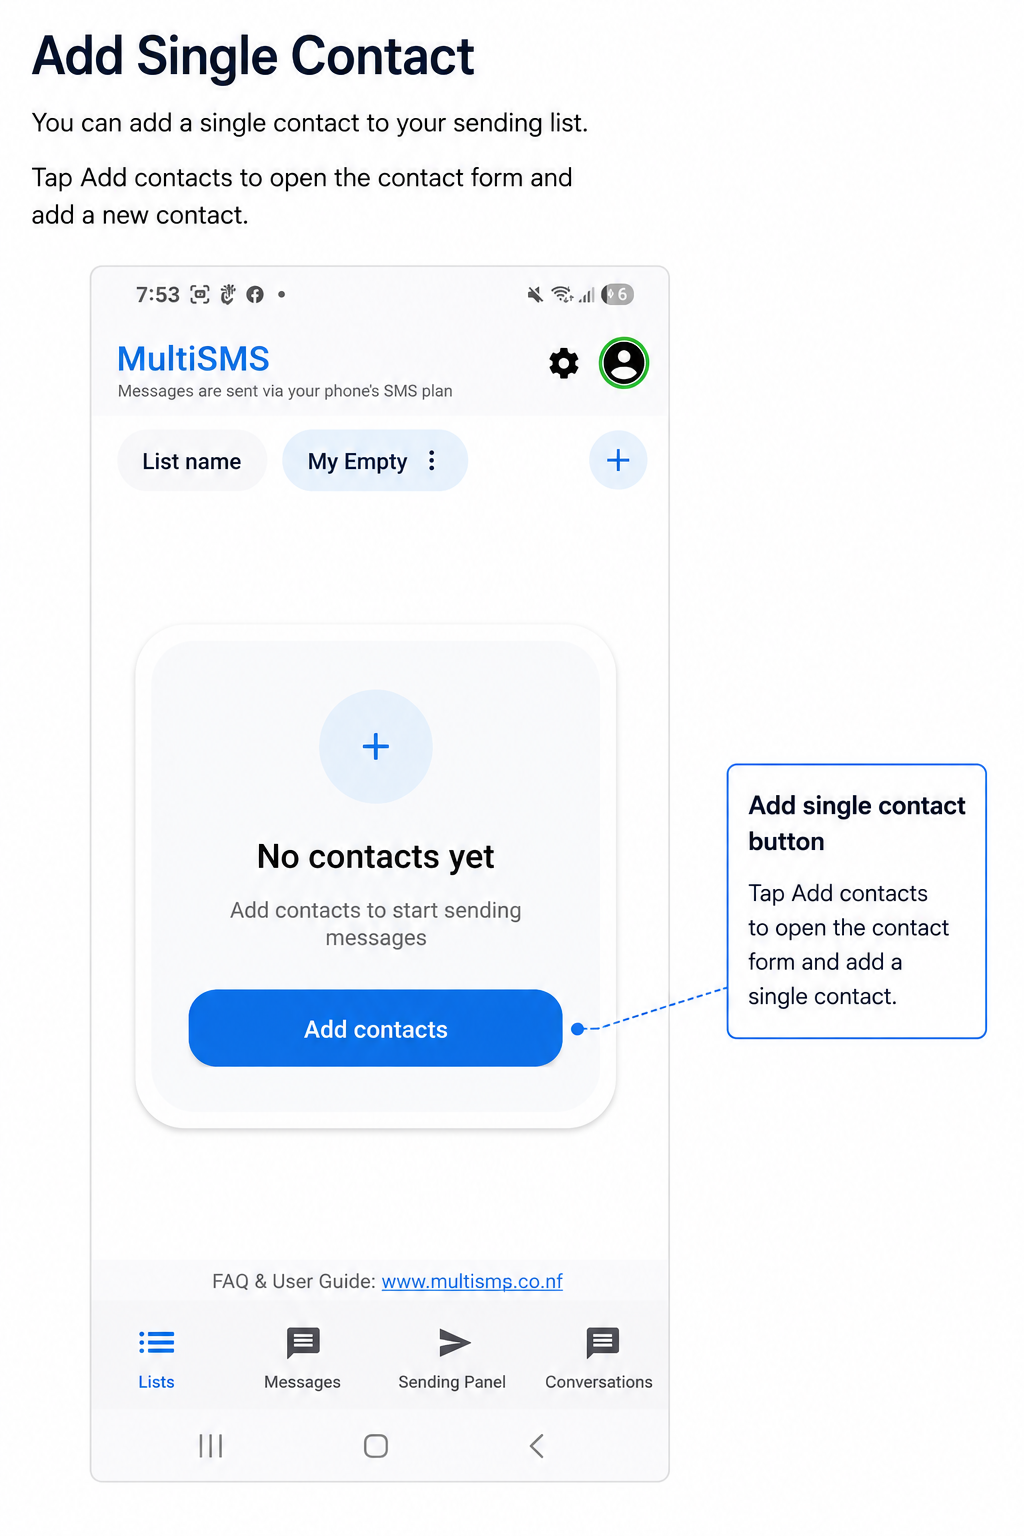
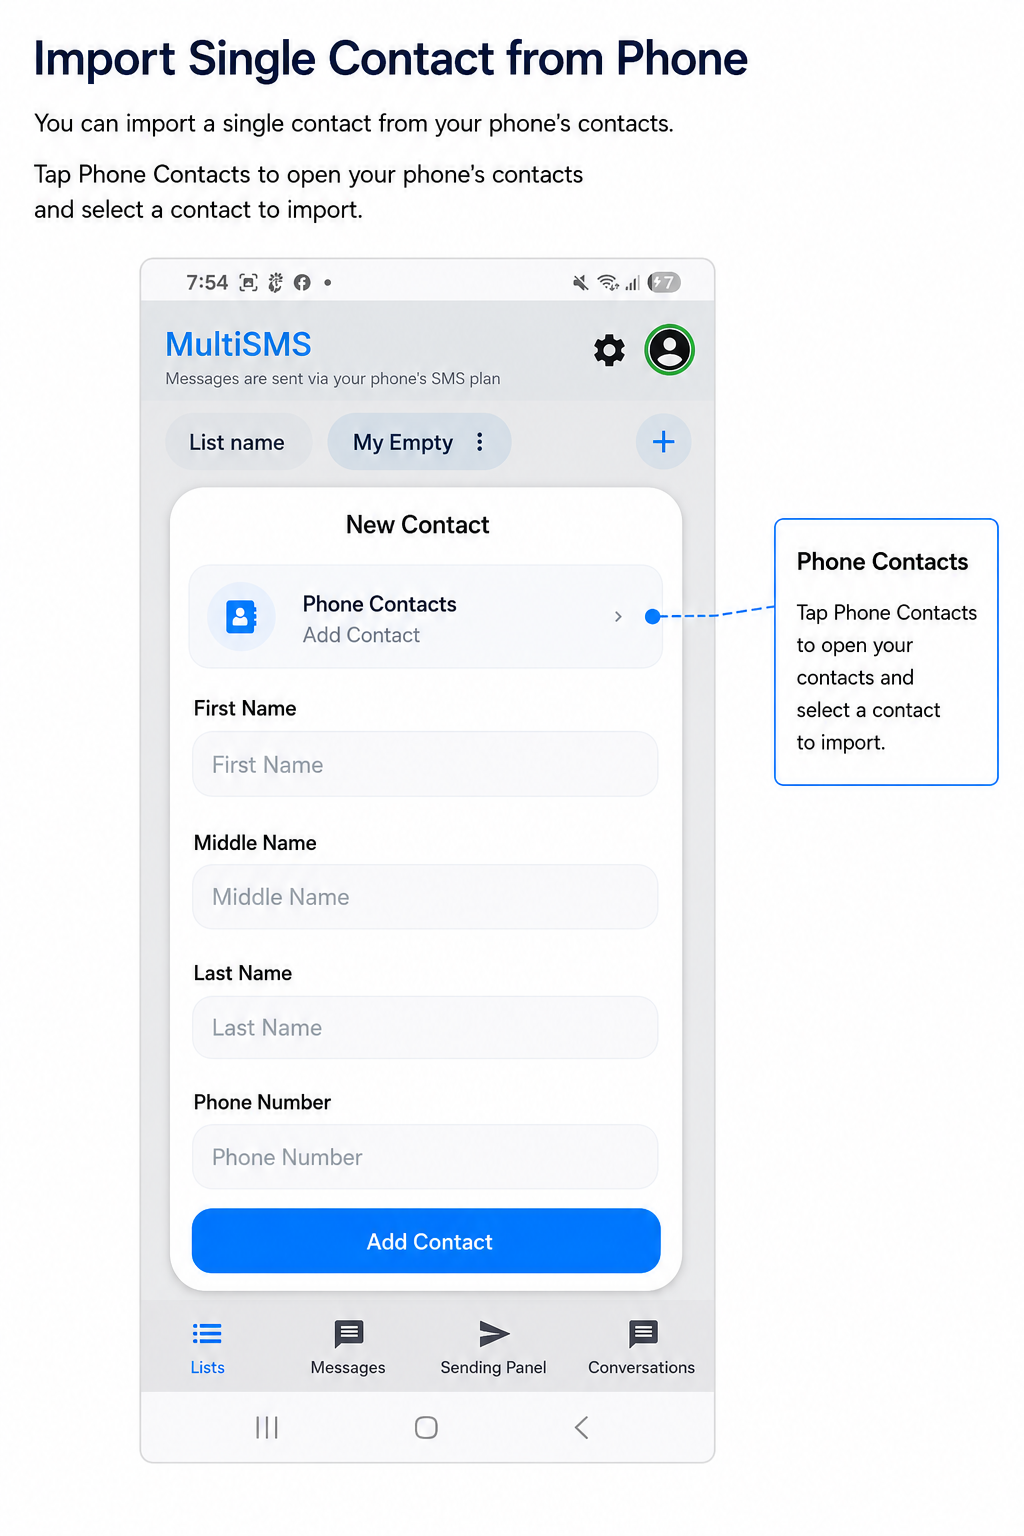
Phone Contacts
Used when you want to import all contacts found on your phone device / SD-card.
Phone Groups
Used when you want to import a single group from your phone device (SIM card / SD-card).
Text / CSV File
Used for importing a contacts list from a CSV or Text file. The input file must use UTF-8 Encoding.
CSV: first column = display name (firstname middlename lastname), second column = phone number.
TEXT: each row contains display name and phone number, comma-separated.
Download example files: CSV File | Text File
Mix with Current List
Used to combine two existing lists into one.
MSMS Sending Lists panel helps you to manage your sending lists and prepare them before starting the sending progress.
Overview
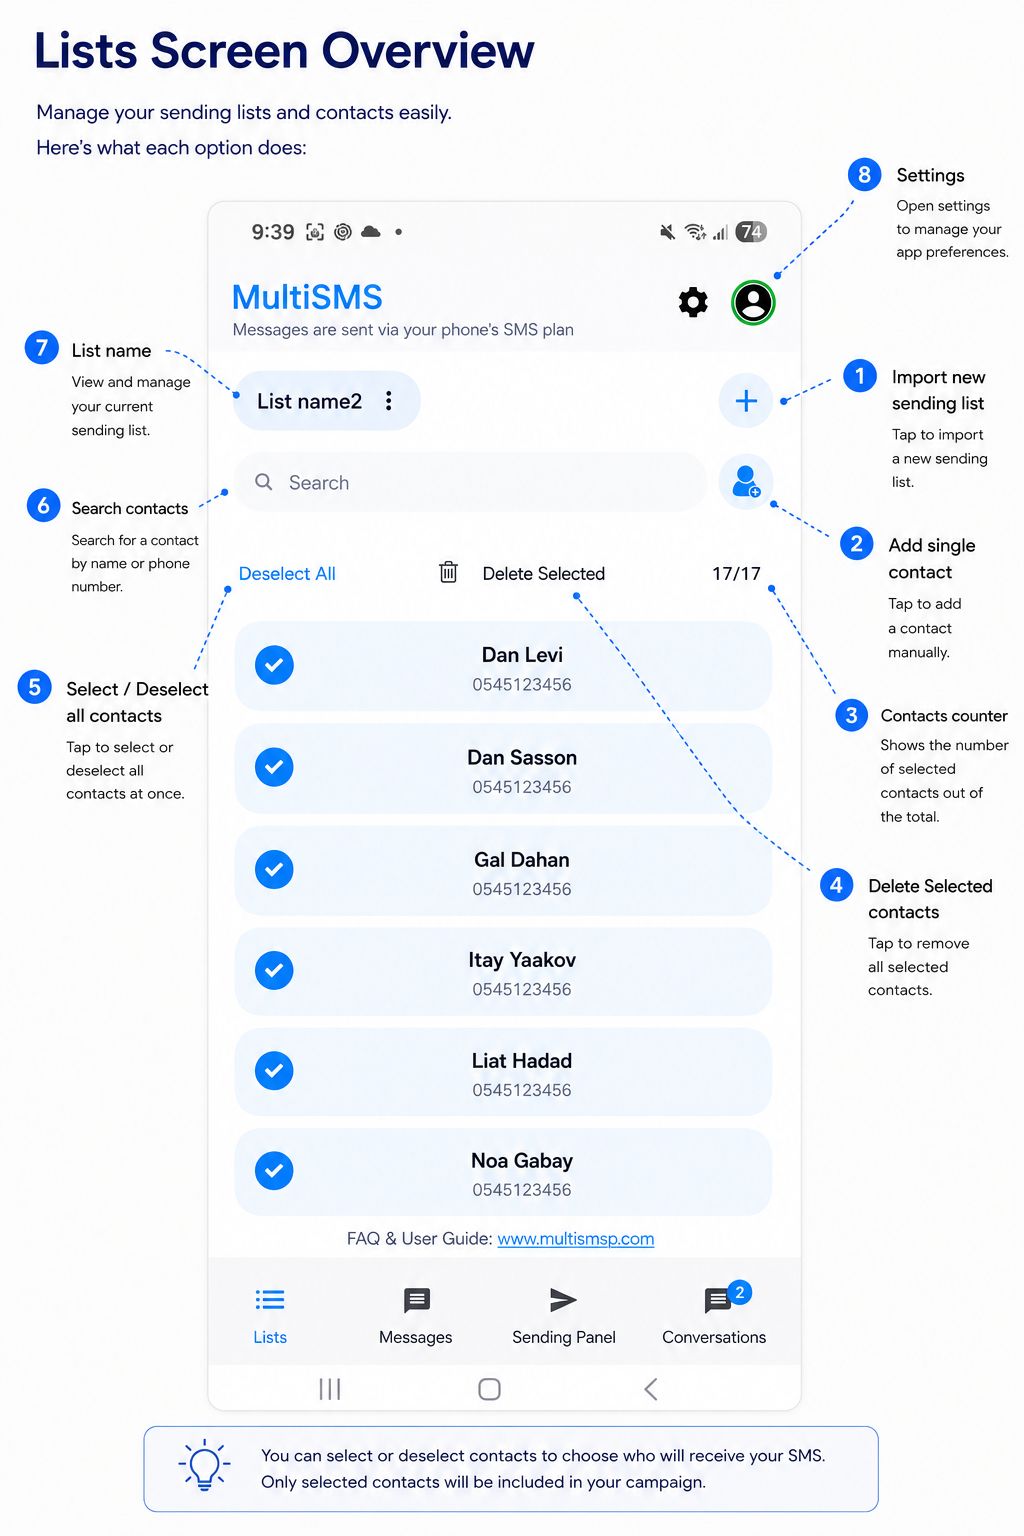
1. Import new sending list
This button opens the Import Contacts window to create a new sending list.
2. Add single contact
Adds a single contact to an existing list, either manually or from your phone contacts.
3. Contacts counter
Displays: checked contacts / total contacts in list.
4. Delete selected contacts
Deletes all selected contacts from the current list.
5. Select / Deselect all contacts
Selects or deselects all contacts in the current list.
6. Search contacts
Search for an existing contact in the sending list.
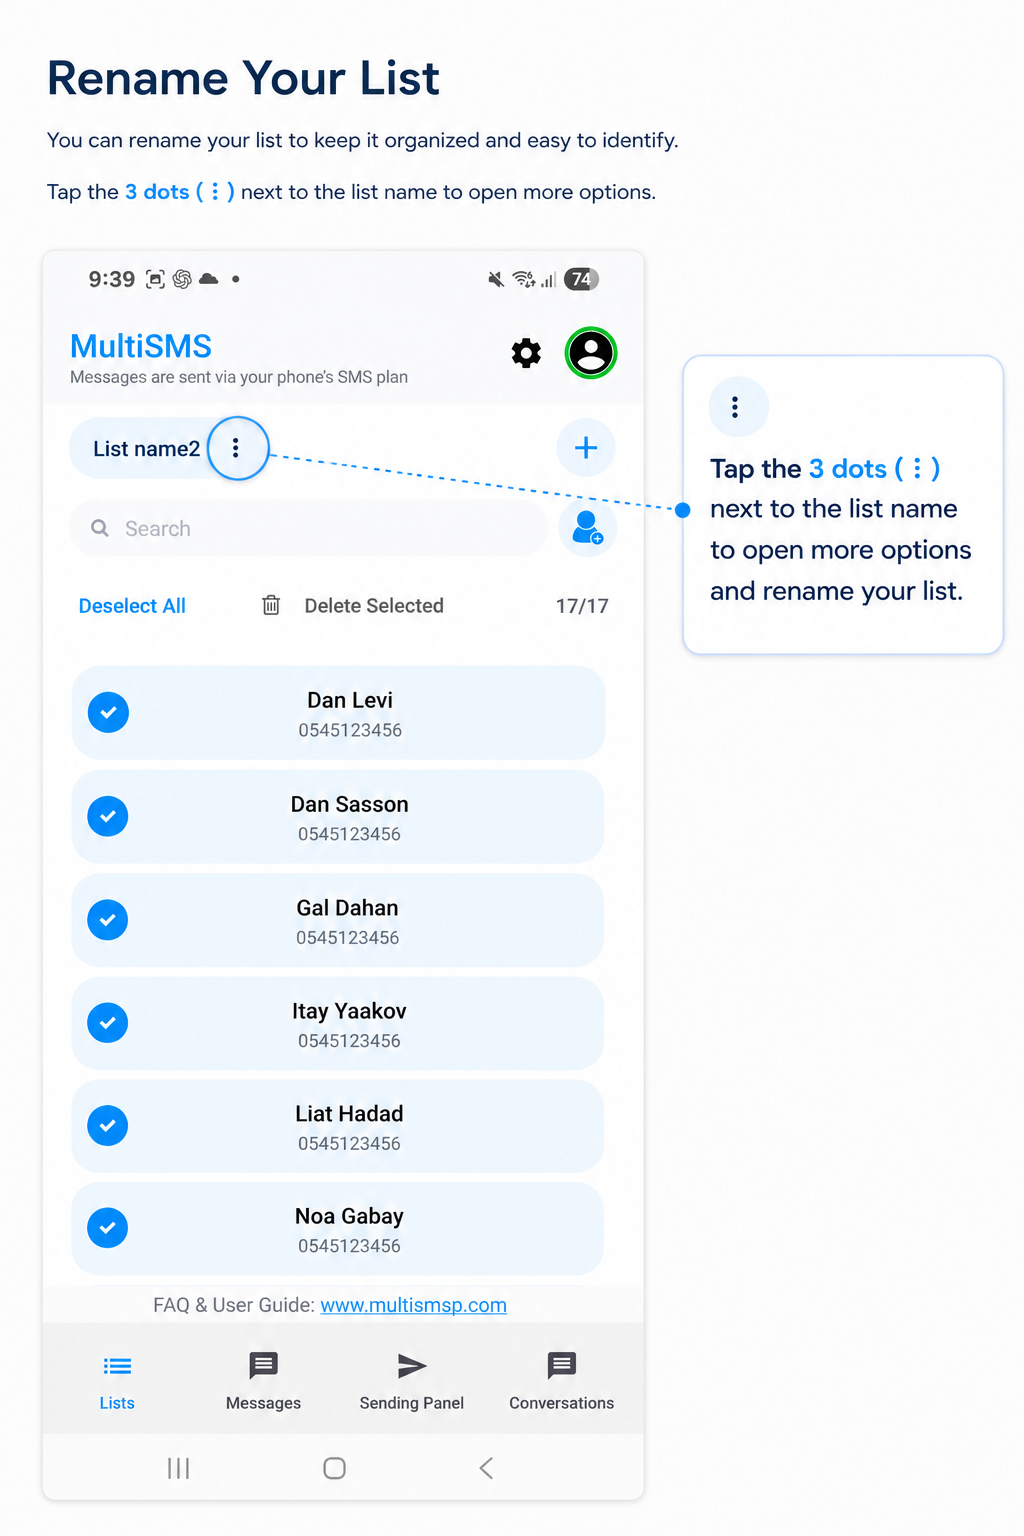
7. List name
The name of the currently selected list. Tap on it to rename.
8. Settings
Opens additional options for the sending lists panel.
MSMS Messages panel helps you to manage your messages and edit them before starting the sending progress.
Overview
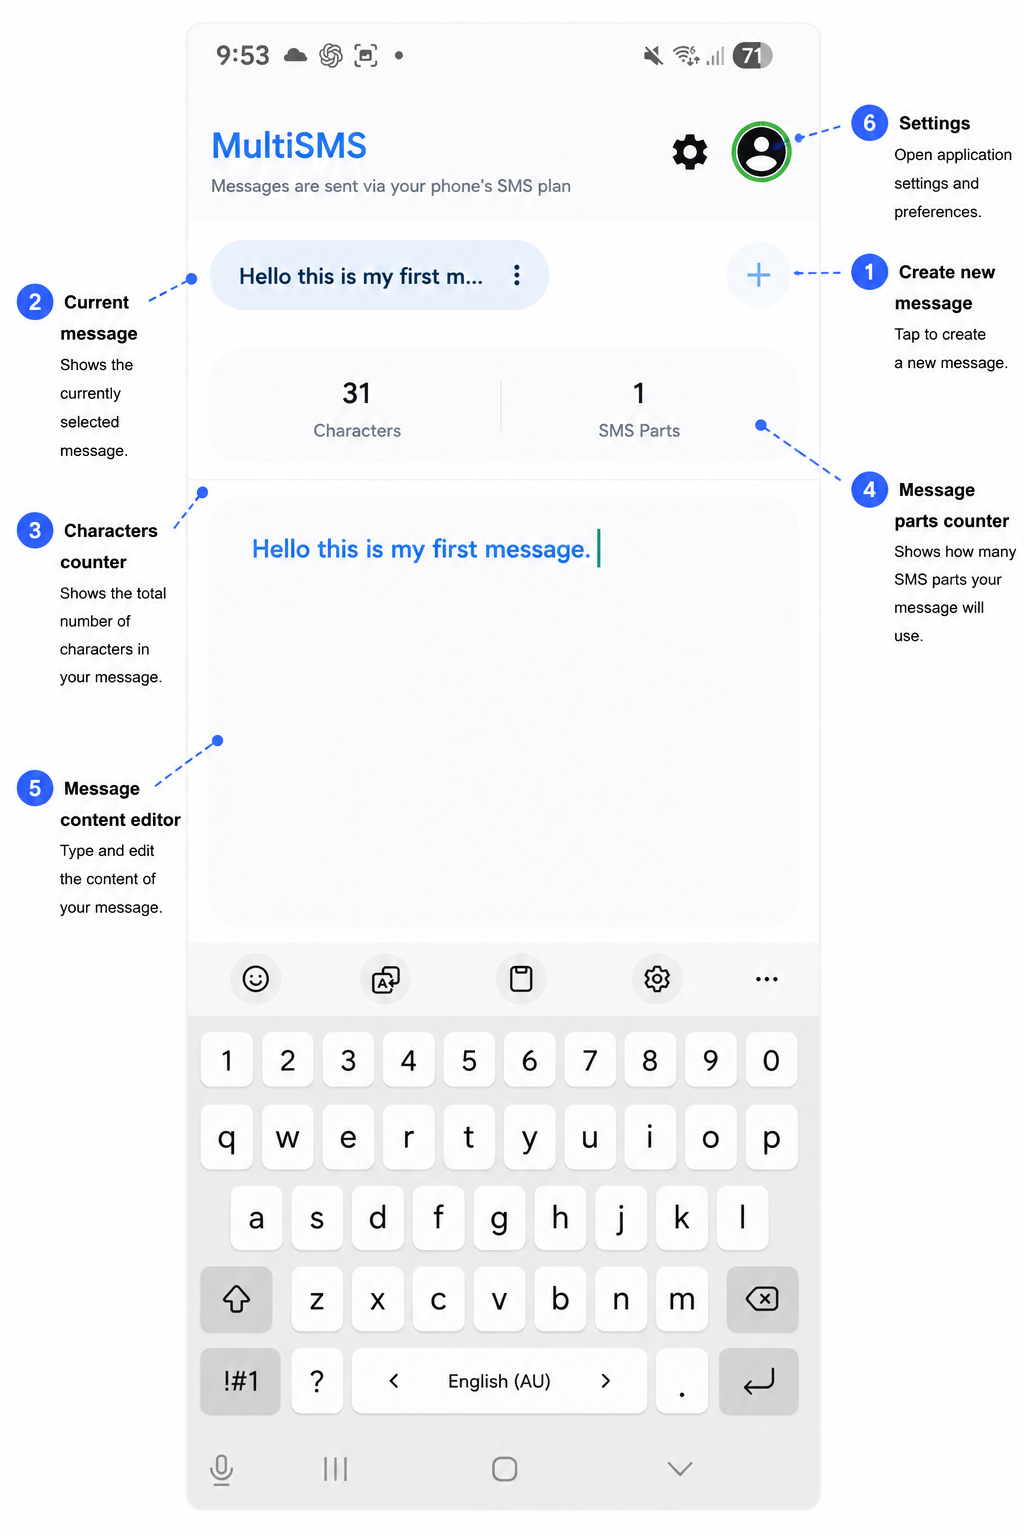
1. Create new message
Creates a new message and adds it to the messages list.
2. Current message
Displays a preview / title of the currently selected message.
3. Characters counter
Displays the message length in characters.
4. Message parts counter
Displays the number of parts that the current message will be sent as.
5. Message content editor
Allows editing the existing message content. Tap on it to enter edit mode.
6. Settings
Opens additional options for the messages panel.
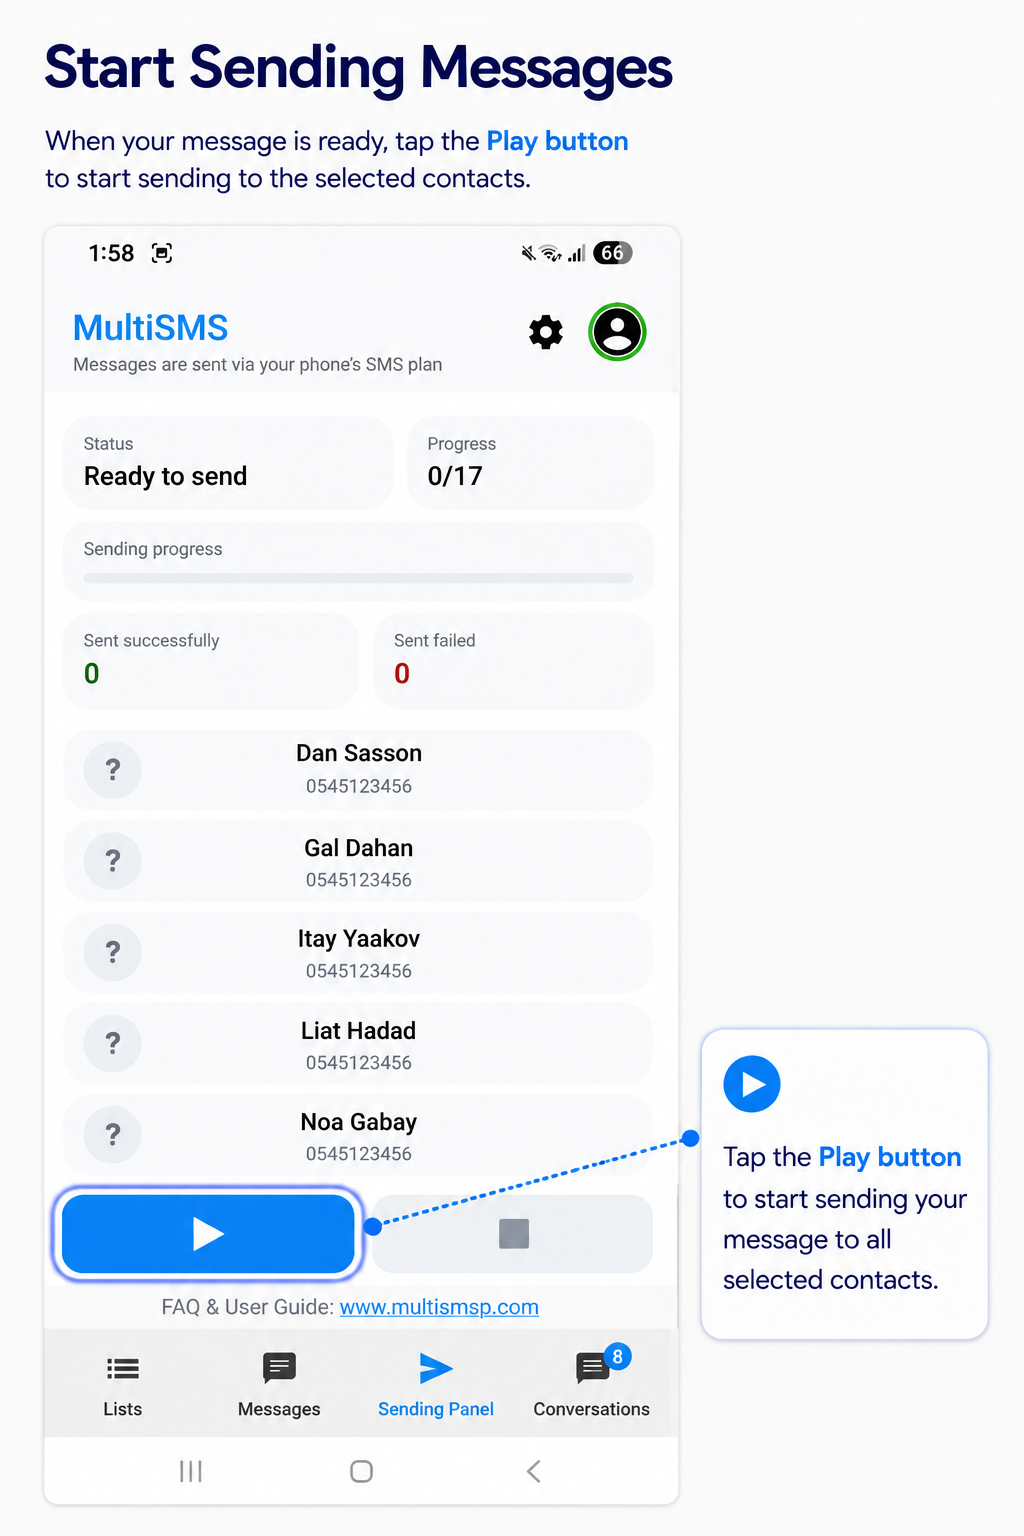
MSMS Sending panel helps you to control and track your sending process.
Overview
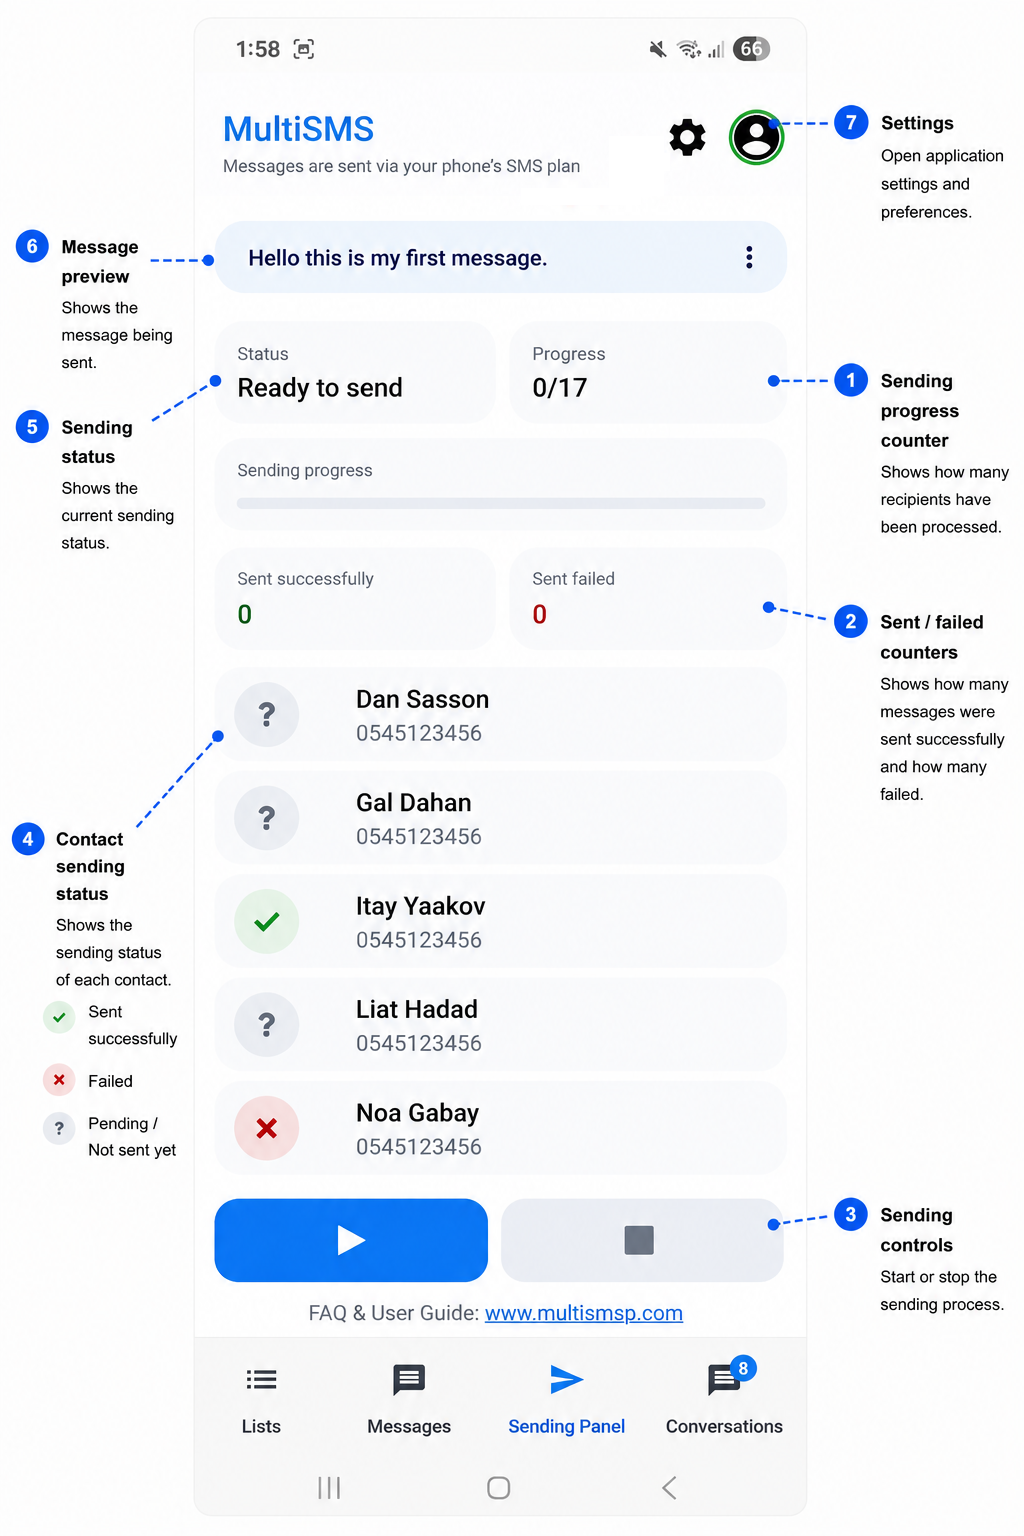
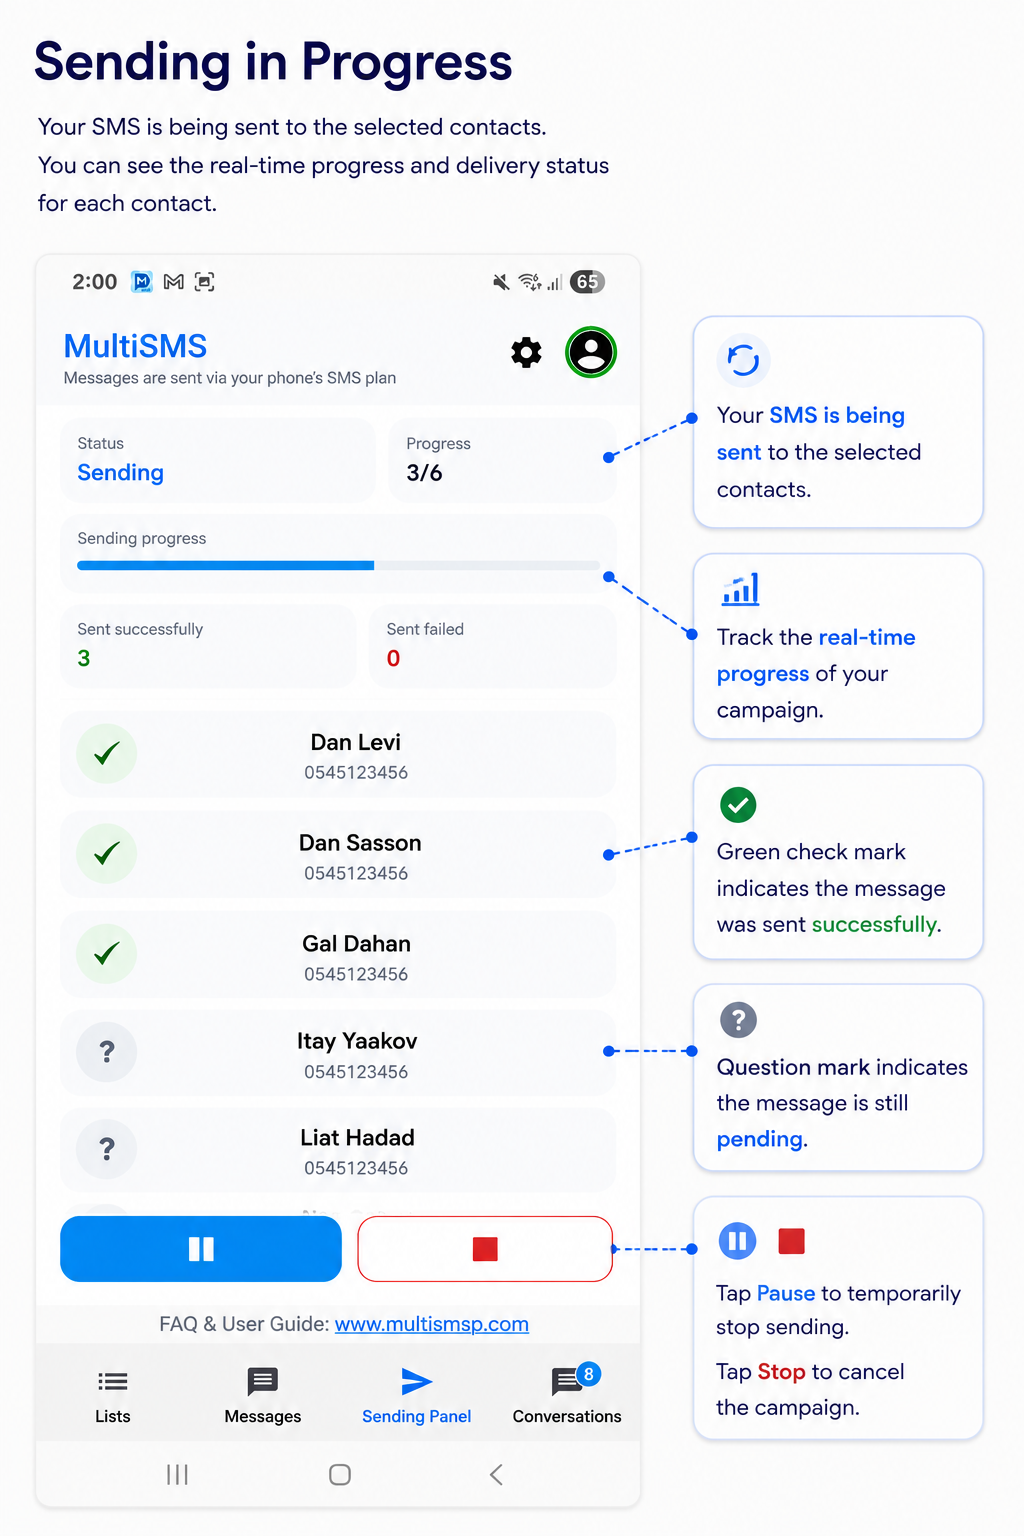
1. Sending process counter
Displays: messages processed / total messages to send.
2. Sent / not sent counter
Displays the total number of messages sent successfully and failed.
3. Sending control
Lets you start, pause or stop the sending process.
4. Sent / not sent status
Shows whether each message was delivered or failed for the corresponding contact.
5. Sending status
Indicates the current sending process state. Possible values:
- Ready to send
- Sending
- Finish
- On pause
- Resending
- None of the contacts in the sending list were checked
- No message selected for sending
- In Scheduling mode
6. Message preview
Displays a preview of the current message to be sent. Useful when using the personalized message feature.
7. Sending panel settings
Opens additional options for the sending panel.